AND GET ANY KIND OF PRINT OR VISABLE PICTURE?
I call it "gradent map photo-filter" process so I don't forget what commands I used in Photoshop to do it.. Sometimes I am fascinated not by new and cool images--but by old rare images produced with modern equipment, old & new or both. Using a simple 1200dpi inexpensive
scanner which does not have transparency capabilities, I created this image and a number of others with these 120 negatives as well as 35mm pictures I took last year. I took the pictures with my 120 film camera this winter in The Dalles. I had the negatives scanned but then
thought--well, I can't scan negatives with this non-transparency capable scanner?
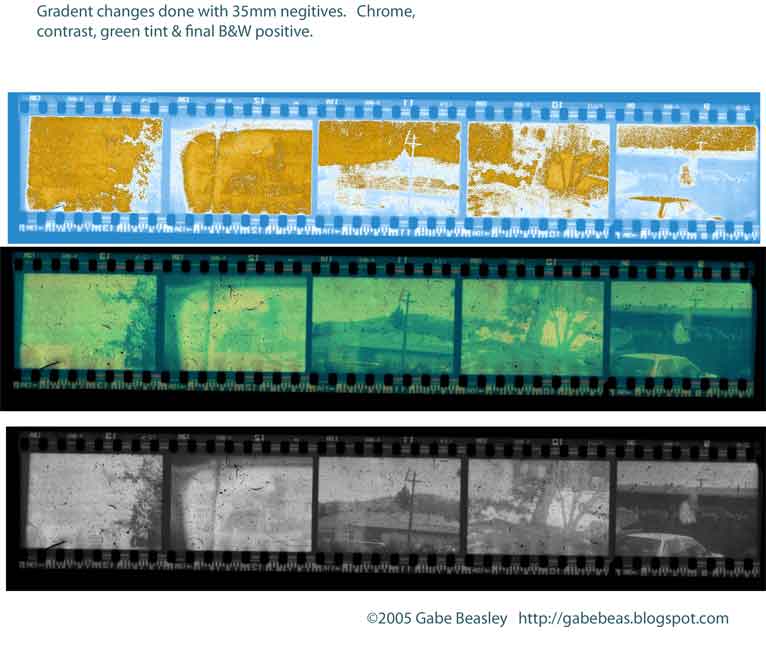
This is what I got with a very DUSTY scanner I forgot to clean. This shows how useful the adjustments can be. Gradent map provides fine adjustments to bring out colors that otherwise can't be seen and contrasts. The middle picture has only been cropped,,
inverted from negative form and balanced with the levels control. The last image is a black and white one created with the Gradent map and a photo filter. This is as crude as it gets--I slapped the negatives in this dusty old scanner I've not used in months and scanned them. At first I was not going to do a show of 35mm but I thought since most people only have 35mm ability. It would be right to show what can be done with it and that you don't need an expensive 120 camera to do this stuff. The dust could seriously have been omitted here. I left it in, almost on purpose.
 Being one who defies convention and the word "can't" I of course, I had to give it a try. I knew Photoshop had enough tricks to do something with a scanned image of negatives. And I knew light had to react to the negatives somehow. So I did it. First at 200dpi then at a much better 400dpi. When ever you are scanning negatives--you usually want lots of dpi. 120 roll film is usually scanned at I believe thousands of dpi--it takes a lot of time. My simple scans were quick and made for no more of a print then a 20x30 at most or whatever--but this is art, not science
photography--so who knows how big prints could get and be worth printing. If it is worth printing at all.
I thought this was another cool strange process I came up with to defy convention yet again. As I often have, or tried to, do because of a low budget and to see how far I can go on it. Had I been born a rich photographer I'd probably be "in the box" with my creativity, limited to copying what is supposed to be "photography" with massively expensive gear to die for but little understanding of the mechanics and what it's like have to push the limits or to find new things and figure out the technical end of things for myself. Had I done so many of my pictures may not have been possible. I'm glad in a way that I was forced to start out on a low budget because
it started a thinking in me that I doubt will end no matter how much gear or money I have in the future.
To be on the budget I am and have no other choices and thus create options that apparently are impossible because I had to, started a thinking machine in my mind. Creativity is not just in your abilities, it is also connected to your limits. In other words--I might well have been a far more dull photographer and not had nearly as much fun had I had everything I ever wanted. But now it's time to get all the gear I ever wanted. (I WISH)
Anyhow--This old scanner was about 20 bucks at a thrift store--new in the box. I was surprised at what I found when I did some playing around in Photoshop. After I scanned these 120 negatives. I also scanned 35mm negatives and got similar results--they were good--but for purposes of preferences and ease here I chose to use the much larger 120 format. Below is thescaned 120 negatives with no editing at all. They have not even been flipped so they look correct.
 Once the negatives are scanned of course you see only a slight trace of the image even if the negatives are under-exposed. You have to do some work in Photoshop to see anything, crop and rotate to view, and then the levels control was first on my list. I finally chose this sepia
chromatic look to it because it was a side effect--not done by me. The color scanner had trouble distinguishing colors (at least with my first few tries here) in the transparent negative. I believe it is not very possible to get color positives out of this due to the intermix of light
which happens inside the scanner itself. (I'm not sure about this) This scanner was not built to scan negatives, or course. To do that you need a very different more expensive scanner with a light on both sides to get the transparency rather then a backwash of light
from the reflective lid.
What I did with Photoshop was pretty simple--I went to levels control and then photo-filter default and I was able to obtain a tainted but good image from the negatives which had accumulated a ton of dust from this scanner I pulled out of one of my gear piles--
making them look nice and old. I did not clean the thing before I tried this. I just scanned. And got a strange mix of reality and film and technology which made me think of early
photography and strangely shaped long prints. So I chose to take the entire sequence of 120 negatives that could fit in my scanner and make it into one file. I then reduced it for my website and there it is. I used a neat tool in Photoshop called "Gradient map" and "photo-filter" to produce clear positive images from these color negatives. Using other processes I was able to produce semi- color positives. It's a simple matter of inverting the scanned image of course and then adjusting levels and possibly a few other things. I think with even more tweaking if I really wanted too--I could scan these at several hundred dpi and produce a printable clear image
which has retained some of it's color and most of it's sharpness. It's hard to beleave these picrtures were taken only a couple of weeks ago when it snowed here in The Dalles.
(120 finished)

BE SURE TO CLICK ON THIS PICTURE TO SEE IT LARGER.
I WAS ABLE TO PULL THIS MUCH DETAIL IN LESS THEN AN HOUR. HOW MUCH COULD YOU REALLY GET EXPLOREING PHOTOSHOP (or Photoshop Eliments?) (this image was not enhanced and by drawing or adding anything to it--it's straight from the negative source negative.
It is clear that trying to scan your negatives with a simple document scanner is not something you will get great results from. But sometimes you can be surprised at what results you do get--and the expressions you might get from them. At best--I could have cut and re-positioned
the positives I made and made nice B&W pictures out of it with more then expected detail. I think this trick is far more for the art and an interesting thing to play with then to practically try to use. But if you are in a bind--it is possible with Photoshop to scan your negatives with a CLEANED cheap one-sided scanner that "can't do transparencies" and pull out your image as well as make it a positive. If you scan it at very high DPI then you could get at least a reasonable picture although it would be the same mix of Frankenstein parts and processes I've used to
make the other strange pictures I've done here. Definitely not your usual nice 120 portrait- or even close! However, when scanned at higher res a surprising amount of detail can be found and pulled out of the image with some Photoshop work.
Have fun--if you got a scanner--even a really old one--you can do this too--just up your dpi and it can be done with 35mm negatives as well. Be sure not to scratch your negatives and just dust off your scanners DON'T use Windex! So yes--a regular scanner can scan negatives and
make a positive print. You might find at best to get a two color or more of a black or sepia like image. But it can be done--and quickly. This is mainly an artistic process--definitely not a way to get anything out of your 120 or any other pictures. A note here--these 120 images
I took just a couple weeks ago turned out very well in print form so you can reference that to the quality displayed here. I could have done a lot more to sharpen and highlight this image or crop into at high dpi. There are countless variations on this and I would not surprised if long experiments got ok color images from negatives. But you will never get close to doing what a real transparency scanner can do--so don't get your hopes up thinking you can make prints
with this that are anything more then experiments or fun projects.
Don't forget though--you can't start any of this stuff without choosing the "invert" option in Photoshop so that your negatives become positives, more or less. I used "high quality color scan" with this 20 dollar simple scanner. Have fun-
No comments:
Post a Comment